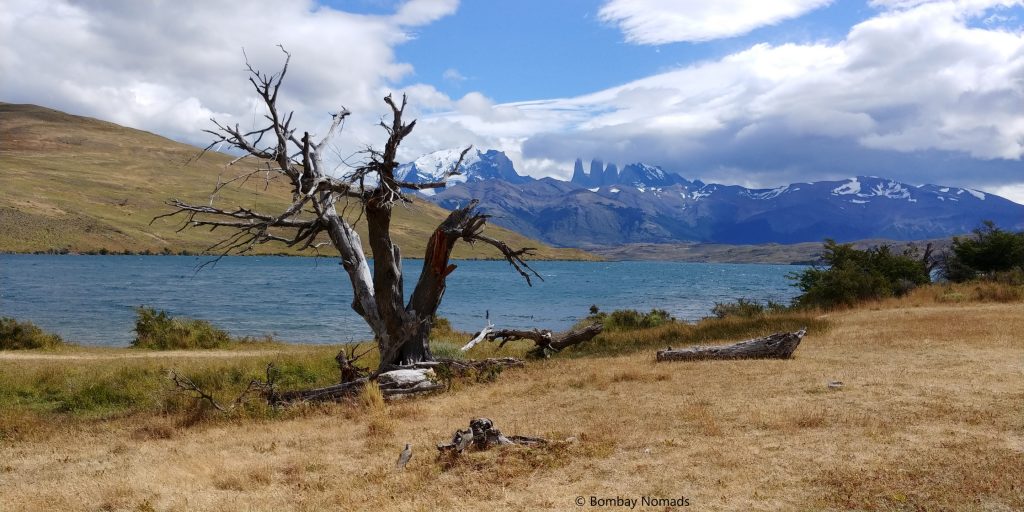
Torres del Paine (TDP) is a spectacular combination of towering granite mountains, enchanting blue lakes and rivers, large glaciers, golden grasslands and lenga tree forests. And it is THE most beautiful place we have ever seen (Iceland, New Zealand and Ladakh included). We know we are talking in superlatives, but no place has lived up to its reputation of unparalleled beauty more than TDP for us.
TDP is a huge national park in the extreme south of Chile, and is known internationally as having the best treks in the world. Situated in one of the offshoots of the Andes mountains, the park evokes wonder from the steep mountains that seem to have popped up straight from the surrounding grasslands. Because of its remote location and the tourism policy adopted by Chile, hiking/trekking is the principal way of exploring this rugged national park. However, don’t be disheartened if you do not want to do multi-day treks – non-hikers are definitely not deprived of all the beauty that TDP has to offer.
We formulated a 4-day itinerary, that included one serious trek – to the Base of Towers (the most famous feature of TDP) – and driving around the park with smaller hikes for the remaining days. And the trip ended up being the most beautiful experience of our life!
Day 1
Our Torres del Paine trip got off to an inauspicious start when we couldn’t find our rental agency on the map. Turns out we (ahem, Pradosh) had gotten the city wrong altogether – booked a car in Punta Arenas, instead of Puerto Natales! In the high tourist season, and in the little town of Puerto Natales, finding a rental car at short notice seemed impossible. When we managed to convey our predicament in broken Spanish to our car rental agency, Recasur, they were kind enough to help us out and procure another vehicle.
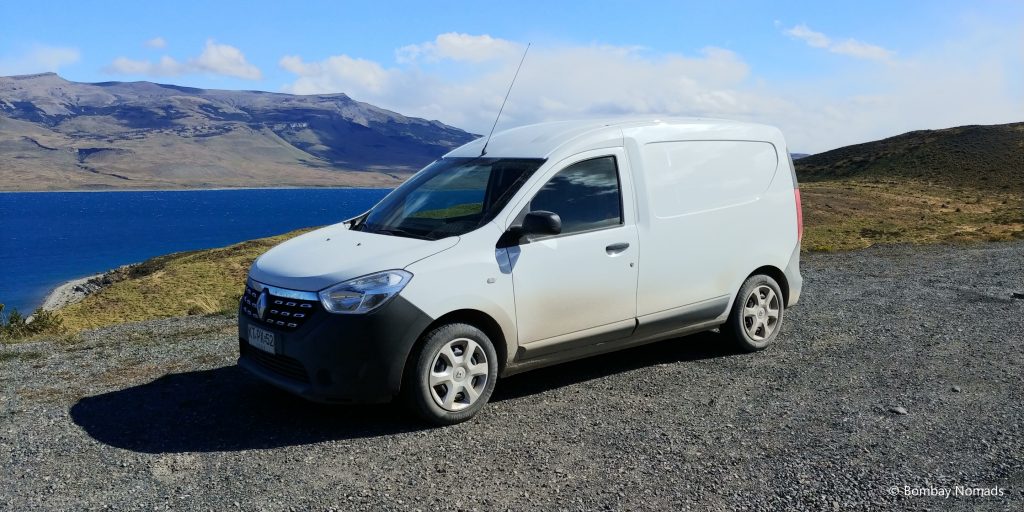
The substitute vehicle was a Renault Dokker, a small commercial van, converted into a two-person camper. It is an ungainly vehicle, with no windows except those on the front doors. It had the ground clearance of a sedan. It was a far cry from the Renault Duster we had booked, and we did not need a camper, but it was the only option available to us. The only good thing about the vehicle was that it was brand new. So the weird-looking Renault became our steed for the next 4 days. And as it turns out, it served us really well and we grew fond of our little van. Thankful for getting any car at all, we started our trip and drove to our hotel, Posada 3 Pasos first. We quickly checked in, left our bags and got back in our car – we had a date with Torres del Paine!
Almost every travelogue to TDP covers the 4 or 9 day long “W” or “O” treks. But there is not enough information for those driving their own vehicles. We had pieced together list of sights to see in the park, but did not know details of which park entrances and routes we had to use to reach them. The following is information we have gleaned AFTER our trip to TDP:
There are 3 road entrances to the park (Porteria = entrance):
- Porteria Rio Serrano – This is the main entrance used by most people who come from Puerto Natales, especially the tour buses. Most of the hotels are also situated just outside the Rio Serrano entrance
- Porteria Laguna Armaga – This is used for the Base of Towers hike, and also the site for a big CONAF visitor center
- Porteria Lago Sarmiento entrance – This is a smaller entrance not used a lot, but the one closest to our hotel and the town of Cerro Castillo
On our first visit to TDP, we drove through the Lago Sarmiento entrance because that was the closest to our hotel on Google Maps. It turned out to be the right choice as the roads from Puerto Natales all the way to Cerro Castillo are in very good condition. Keeping speeds above 100 kmph was not a problem at all and despite being a van, the Renault Dokker handled really well.
From Cerro Castillo onwards, the road is a gravel one and the going was very slow. There was road construction happening (in Jan 2019), which will hopefully result in a fully metalled road sometime soon. But at least then, there was about 20 odd km of gravel roads, followed by a couple of kilometres of potholed roads, before the road evens out again.
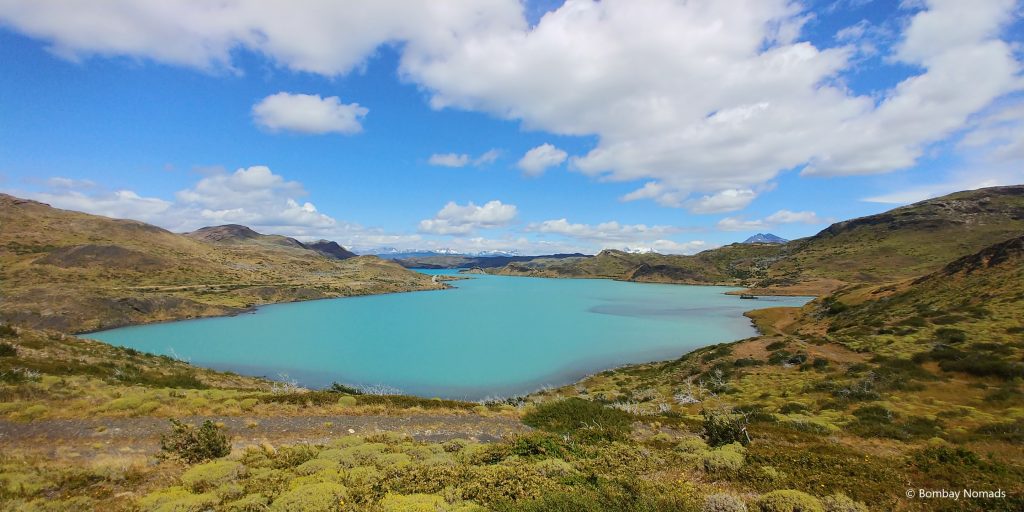
By now, we were on the periphery of the park and the first mountains were already visible, with snow caps on some of them. We soon came upon the majestic Lago Sarmiento and the first glimpse took our breath away – despite the mirador (lookout) being farther than optimum for good photos. At 12:30 in the afternoon, the lake was an intense blue colour, a shade we are not sure we had seen before.
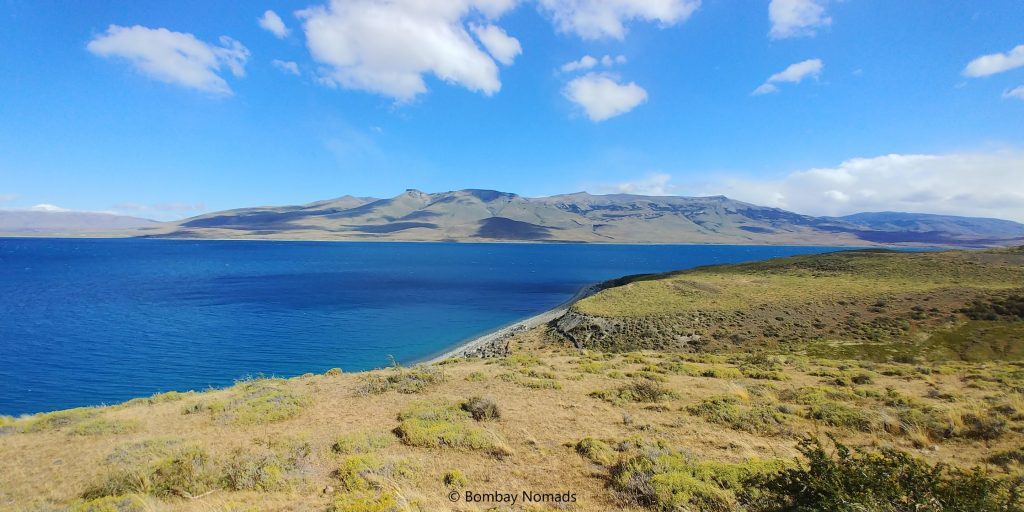
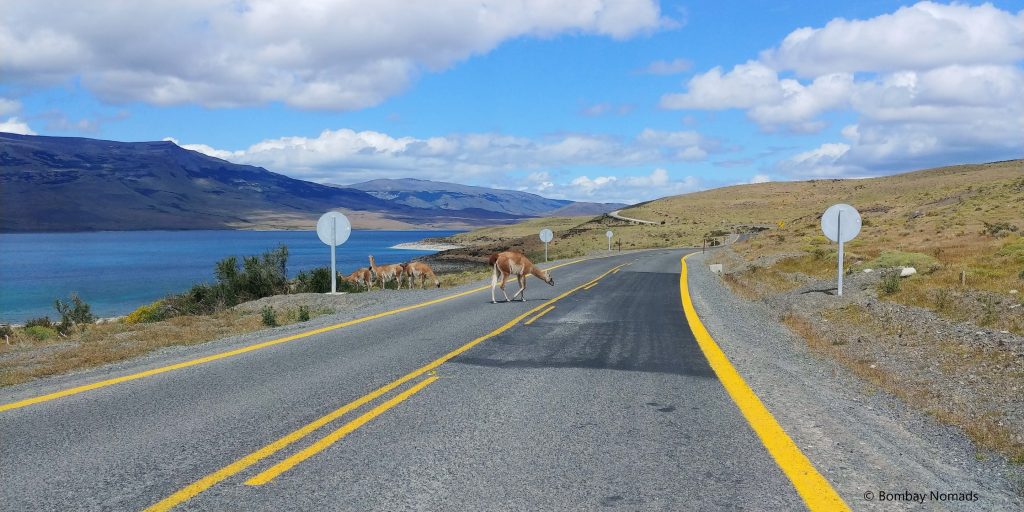
From the mirador, the road stuck to the side of the lake for a while, eliciting multiple ‘oohs’ and ‘aahs’ from us, every time we would take crest a hill or take a turn and a new vista would open up. At one such site, we saw a few guanacos grazing by the road. We stopped to take pictures and the animals did not get bothered at all, although they moved away if we went closer. Happy with our first sighting of guanacos so soon, we continued on to the park entrance.
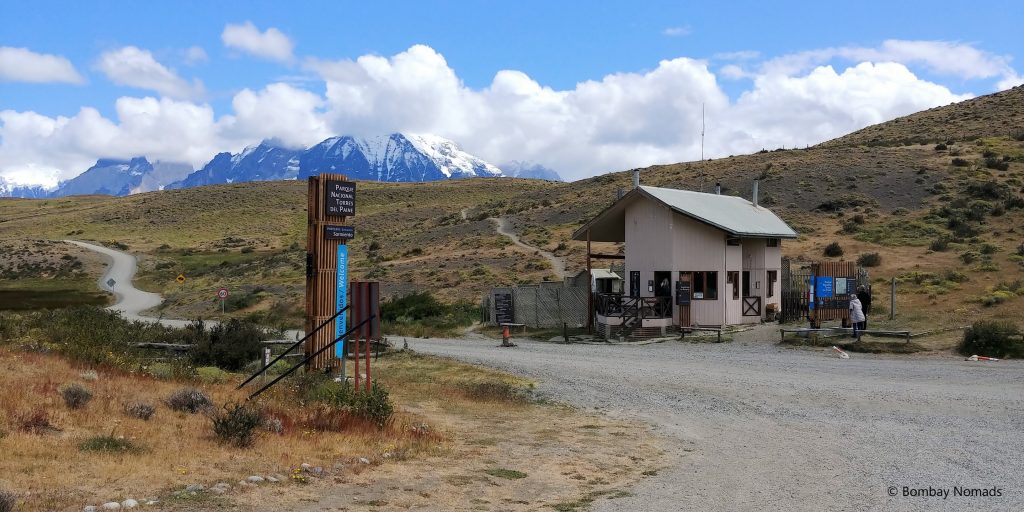
When we reached the Laguna Sarmiento entrance, the ticket issuer had gone off to lunch. There is also a guarderia (Ranger station) at each of the entrances and a guard helpfully told us that we can enter the park without a ticket and pay later in the evening or even tomorrow. He also provided us with a paper map of the park, which had all the smaller trails/hikes marked clearly along with time estimates.
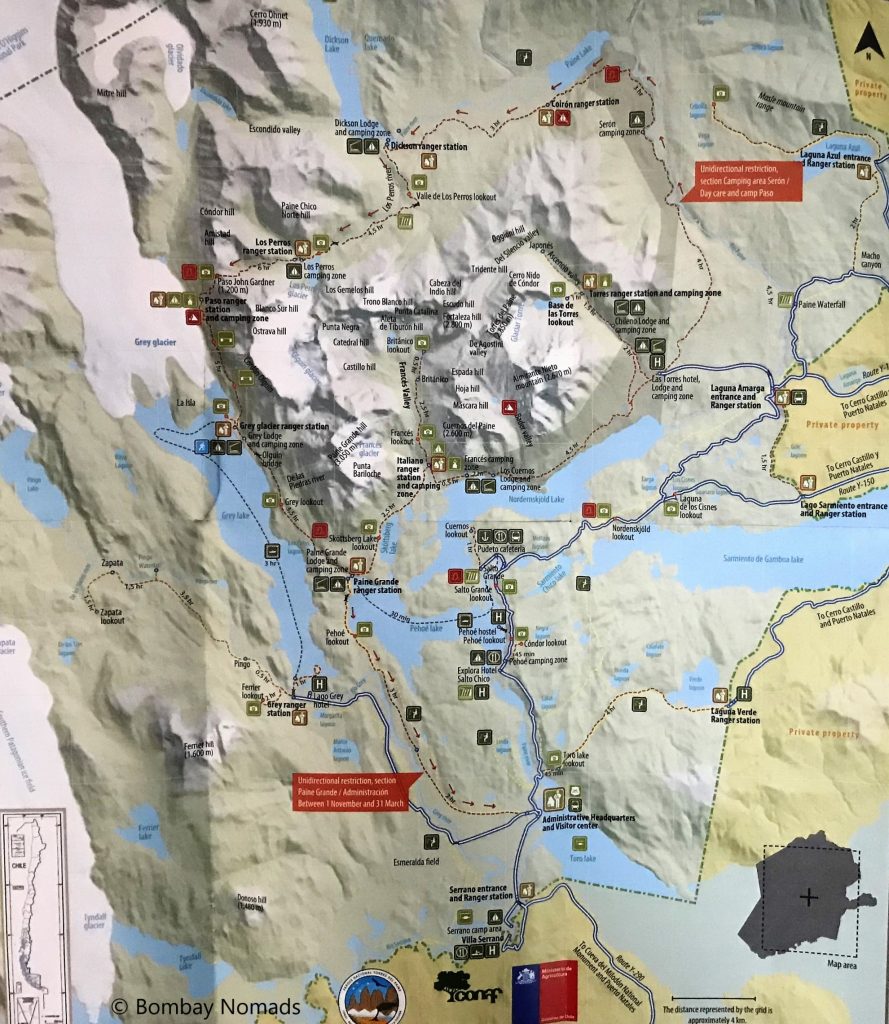
Tip: Keep this paper map with you at all times and ask for a spare copy just in case. None of the online maps we saw had this level of detail.
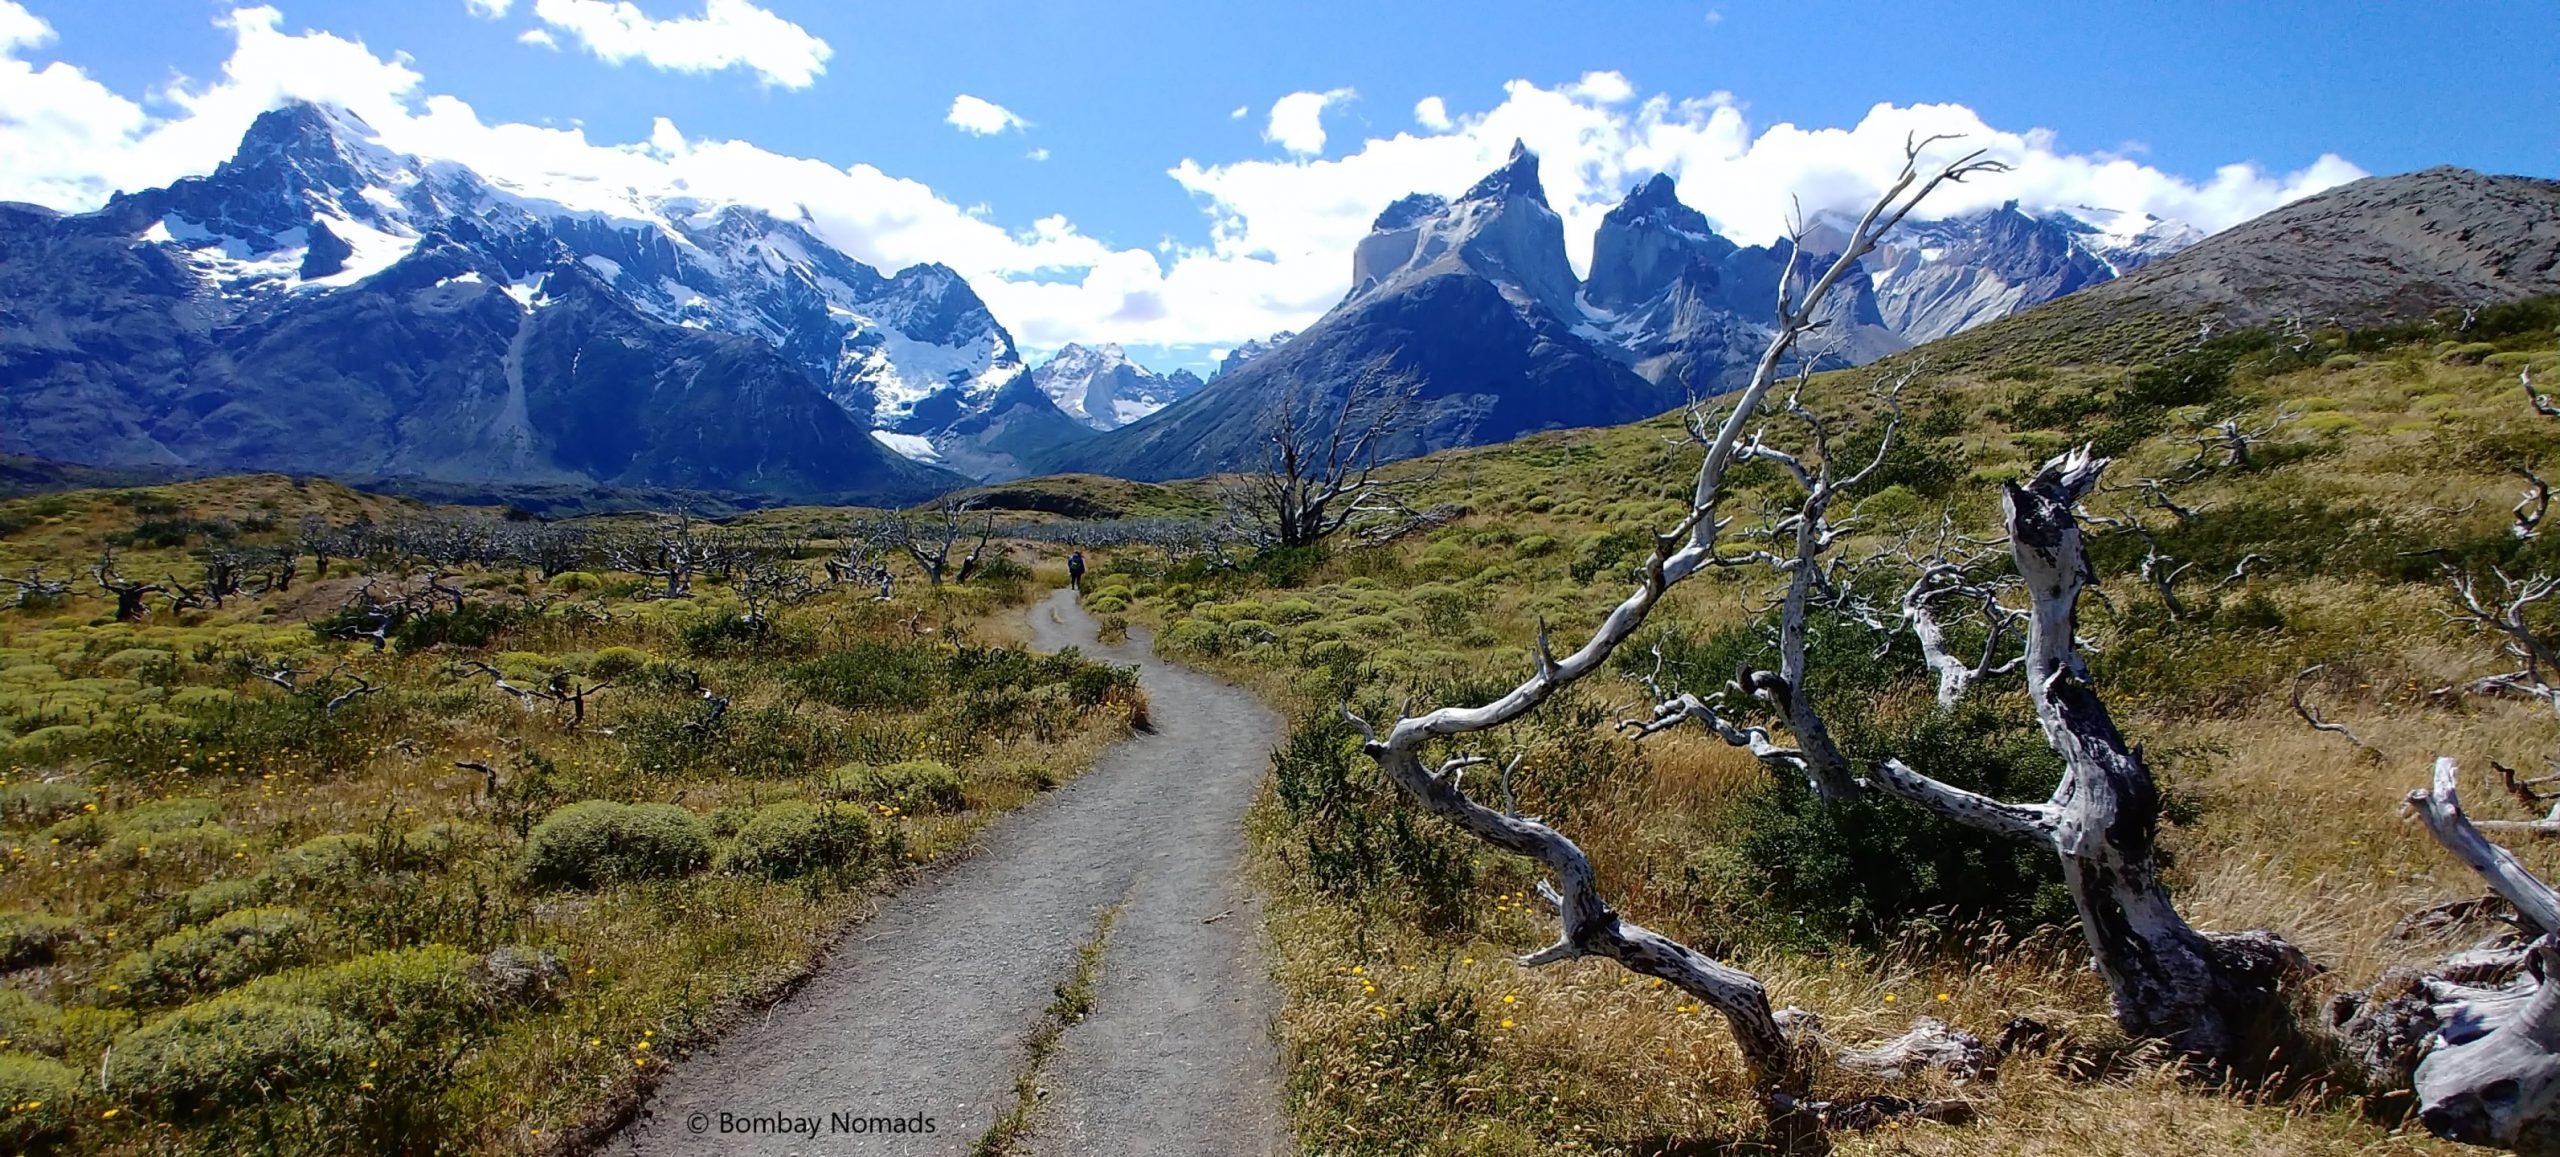
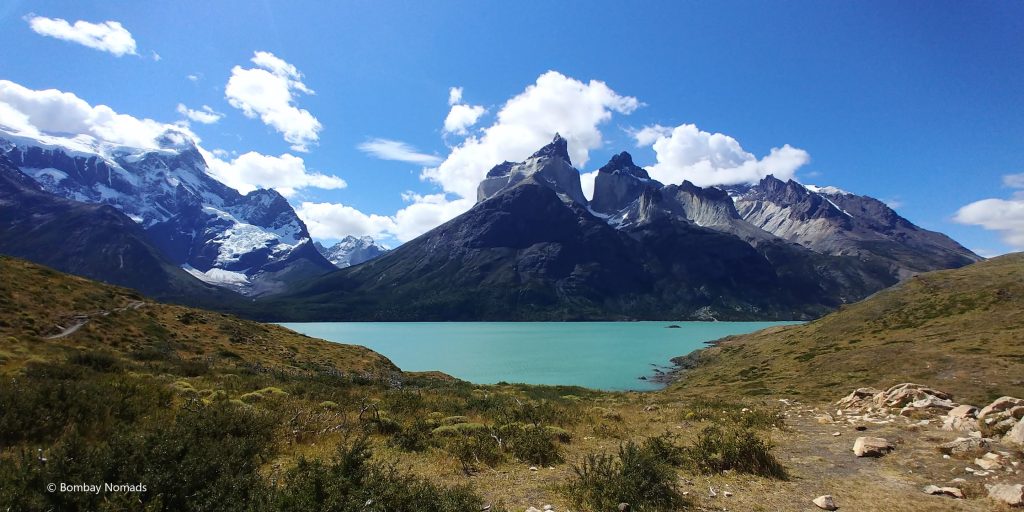
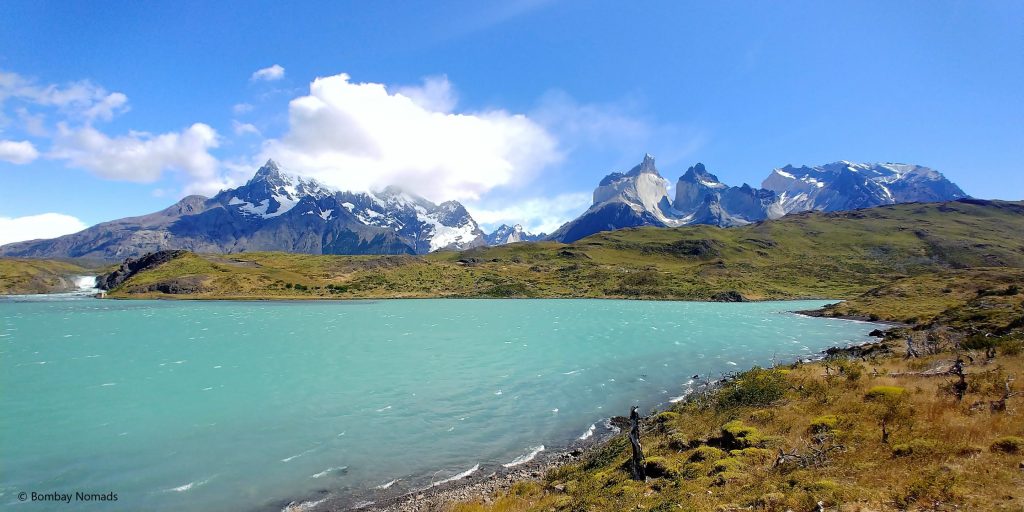
The roads inside the park are unmetalled, though they are hard-packed and not loose gravel. It makes for slower driving, but it is not risky. After entering the park proper, our first stop was at the tiny Laguna de Los Cisnes, which was shade of grayish-green. Our wow moment came when we reached Mirador Nordenskjold. There is a small blue lake next to the large greenish Lago Nordenskjold and the towering granite spires behind. It is a sight that will remain etched in our mind for a long time. And it is a popular stop, as several cars and buses came while we were at the mirador. It was one of those places where you try to take as many photos as you can, and then you just give up and take in the view. No camera can ever do justice to THAT landscape.
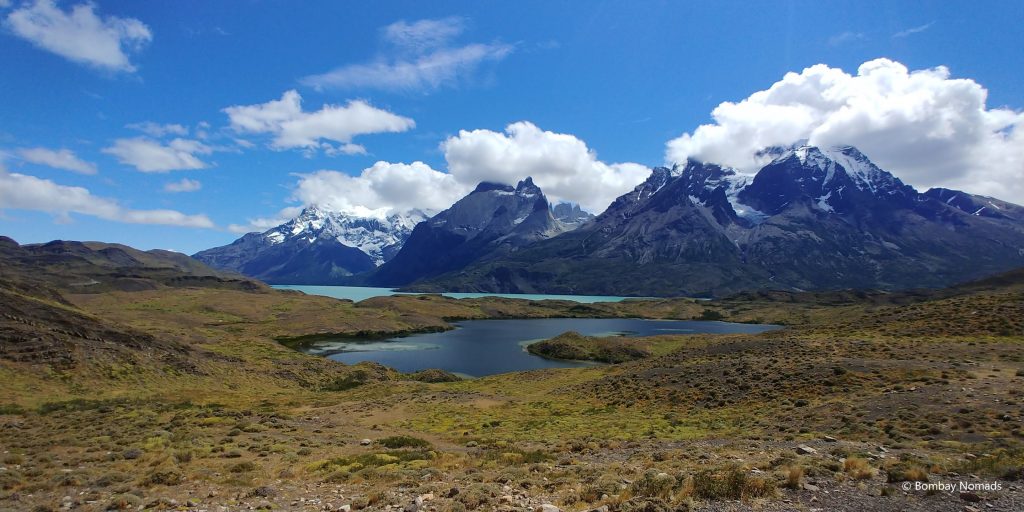
After a quick lunch at the cafeteria next to Refugio Pudeto, we headed to the nearby Salto Grande waterfalls and Mirador Cuernos. Saltos Grande was very picturesque, like almost everything else in the park. The trail towards Mirador Cuernos starts at the Salto Grande viewpoint. The path was not very difficult, but it did have some ups & downs and we made our way in about 50 minutes. The walk is super pretty as the path hugs the blue-green glacial waters of Lago Nordenskjold, amidst the ever-photogenic lenga trees. The mirador at the end of the trail was worth the hike – the view of Cuernos del Paine (Paine Horns), a set of spiky granite peaks rising 2,500m above Lago Nordenskjold, is a sight to behold.
We were about to retire for the evening, when we realised that we had left our rented trekking poles back in our hotel in Puerto Natales! This was turning out to be a day of mistakes. We decided to drive back to Puerto Natales to go pick them up. It was already 17:00 and we agreed not to stop for any photos, as we had a long way to go. Or to be precise, Suchi forbade Pradosh from stopping and he had the good sense to know it was not his day. The route to Rio Serrano took us past Hosteria Pehoe and the landscape was just jaw-droppingly beautiful. The view near Hosteria Pehoe is supposed the best in the park and Suchi really wanted to stop, but she bit her tongue as she had forbidden stopping, and just drank in the view. Plus, we were planning to pass through Hosteria Pehoe at least one more time during our stay in TDP. (As it turns out, we did pass through Hosteria Pehoe three more times over the next three days, but on none of those occasions did we get the same cloudless view that we had seen on the first day. Sigh!)
At that time of the evening (around 18:00), there was a steady stream of vehicles headed back from the park to Puerto Natales and there was a lot of dust being picked up by the vehicles. Once we left the park via the Rio Serrano entrance, the roads did not get better. There were road repairs underway and we were made to wait at several places as only one lane was open and oncoming traffic was being let through. In the portions that weren’t under repair, the roads were narrow and twisty, making it impossible to overtake slower vehicles. We agreed that for the rest of the trip we will avoid the Rio Serrano entrance.
Thankfully, the story had a happy ending – the trekking poles were lying in the luggage area of our hotel in Puerto Natales. After picking them up, we decided to tank up on petrol and then made good speed back to our hotel. We confirmed our orders for packed lunches for the hike tomorrow, packed our back packs and were in our beds by 11:30pm. We had an early start the next day!
Day 2
Today was going to be the biggest hike of the trip for us – the Base of Towers!
Laguna de los Tres trek in El Chalten was the toughest one so far for us, and the internet suggested that the Base of Towers was going to be equally hard, if not harder.
We wanted to start as early as possible since the official time duration to complete the trek is 9 hours and we knew we would be much slower than that. We left the hotel a little after 06:30 and reached the parking lot by 08:00. But then we realised we had forgotten sunscreen – the search for it caused more delays. We also had to fill up some forms at the visitor centre and we finally started the trek at 8:20am.
Tip: Do not forget your sunscreen!
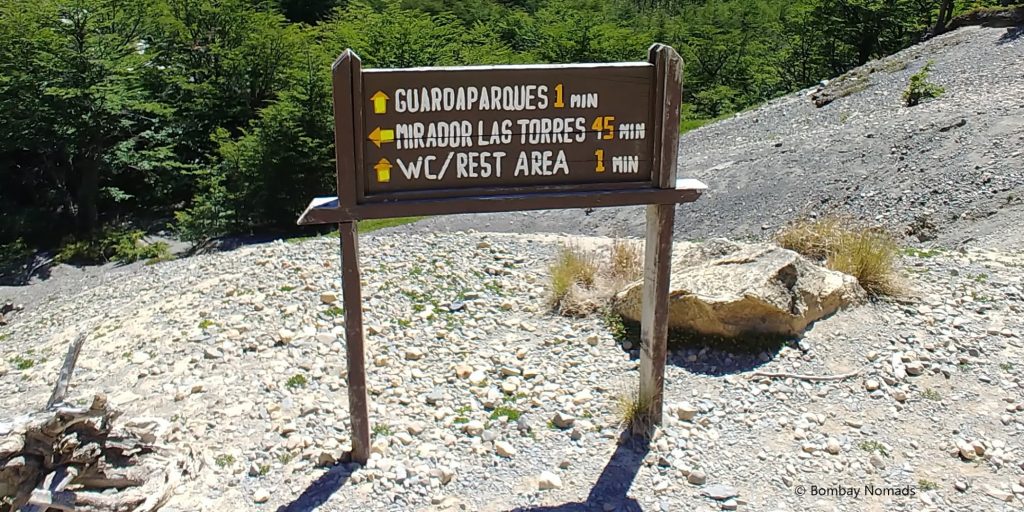
The weather forecast proved to be correct and it was a bright sunny day. Since this trek is very popular, there were a lot of people starting the hike with us. The actual hike starts from behind Hotel Las Torres, an iconic hotel inside the National Park. The visitor centre is about 1.2km away from the hotel. This adds ~2km to the 23km round trip of the actual hike.
The hike can be divided into three parts – the first and longest leg is the 6.5km long stretch from Hotel Las Torres to Refugio Chileno (a camping ground, part of the W circuit). The second leg is 3km trek through a lenga forest along a river valley, and the final and most challenging leg is a steep ascent of about 2km.
The climb from Hotel Las Torres starts gently, with a couple of bridges over small streams, before it gets steep. It continues climbing for 3km and gains about 300 m in altitude (data from Pradosh’s Garmin watch). This walk is in the open, without any tree cover. There are two trails – one for humans and one for horses (horses ferry goods to Refugio Chileno) – and the two trails frequently criss-cross each other.

After the relentless 3km climb, we crossed into the valley at Windy Pass, where a small stream flows out to the plains through a steep valley. The trail went deep into the valley, till we reached Refugio Chileno down in the valley. The Refugio consists of a small cafeteria, bathrooms, a small hostel and camping areas. They also had free sunscreen for use by hikers – which we were quite grateful for, having forgotten ours. We refilled our water bottles, used the loos (500 pesos each) and continued further.
We then entered the lenga forest and for the next 3 km, we had the tree cover, but it was mostly an upwards climb. At 12:45, more than 4 hours after we started from the parking lot, we arrived at the guarderia, which was the second checkpoint of the trek. There are toilets and picnic benches available. We rested under some lenga trees for 10 min and ate an apple each.
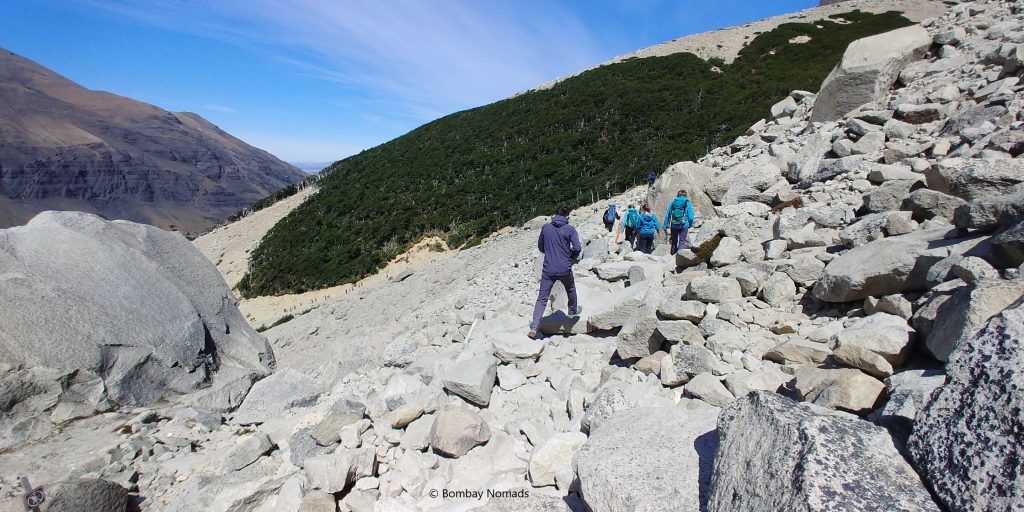
From the guarderia, the endpoint is supposed to be only 45-60 minutes away but we knew we would take way longer. This was the toughest part of the climb, as the trail vanishes into a hillside of gravel and boulders. Since this part is tricky and people are tired by now, movement is slow and it seems like the entire trail is packed with people. Our trekking poles proved to be very useful in this stretch.
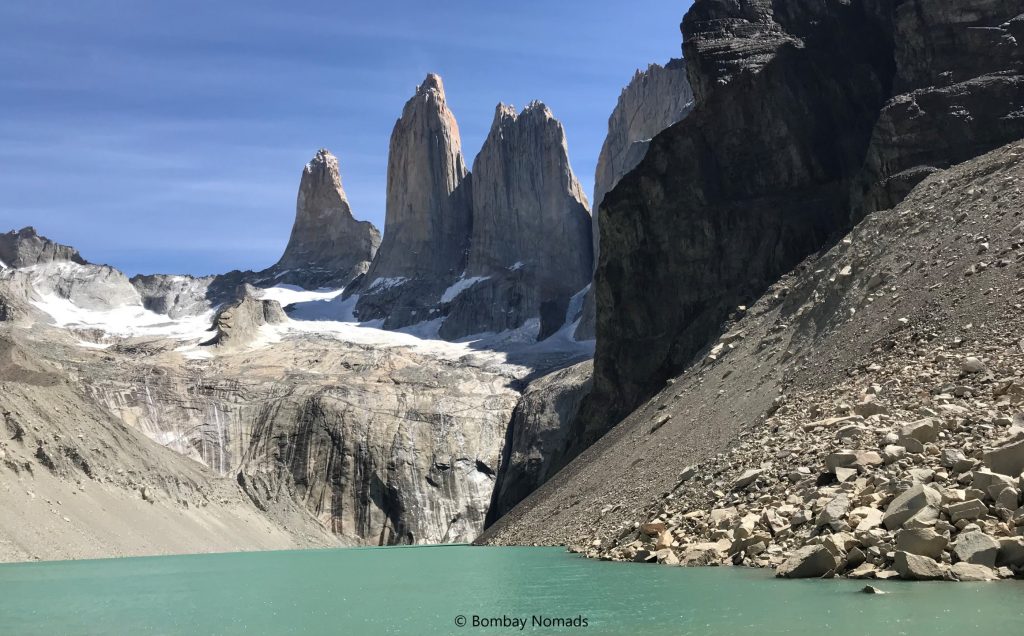
Some portions had no trail at all – we had to just jump from boulder to boulder. Huffing and puffing and taking breaks every 10 min or so, we made it to the top by 14:30, almost 2 hours after leaving the guarderia. The view on the top was amazing, as the three towers were clear of any clouds and rose majestically into the sky. The glacial lake was almost green in colour and it was exactly as we had dreamt it would be.
Okay, maybe there were a hundred more people that we thought there would be, but we weren’t going to grudge them. The crowd did not take away much from the amazing beauty of the place. We found a place to sit down and rest our feet. We finished our packed lunch and took a few mandatory photos.
We began our descent back to Refugio Chileno at 15:30. Again, the trekking poles proved invaluable. But even with the help of trekking poles, we were still slower than most of the far fitter hikers. We reached the guarderia in 1 hour (vs. 2 going up), and noticed that they had closed the final section of the hike at 16:00. There were a few disheartened people who had hiked all the way to the guarderia, to find out that they couldn’t go ahead. We stopped again at Refugio Chileno to catch our breath and fill our water bottles.
Tip: If you are going to the Base of Towers, make sure you reach guarderia well before 16:00 in summers
Energy-wise, we were at the end of our reserves and there was still 6.5km to hotel and then the additional walk to the parking lot. We were dreading the climb up to Windy Pass. We took it step by step, stopping whenever the slope got steep and munched on some walnuts. Fortified by the small breaks, we managed to summit Windy Pass and then started the walk downhill. There was a lot of loose soil, so the descent was slower than usual on our tired legs.
After trudging for 1.5 hours, we could finally see Hotel Las Torres. This brought a spring back in our steps, as we could see the end of our misery. Finally, around 20:30, we reached Hotel Las Torres. The sun had almost gone down, and the wind had picked up. We still had to walk ad additional 1.2 km to the parking lot, which as we had guessed in the morning, seemed double the actual distance.
We took a little more than 12 hours to complete the hike, much longer than we had expected, but the sense of accomplishment was well worth the effort. However, we could not help but compare this trek with the Laguna de Los Tres hike in El Chalten. They are of similar distances (~25 km round trip) and equally challenging. But the views during the Base of Towers hike are nothing special – only the final lake/towers view is very beautiful. On the other hand, the Laguna de Los Tres route was picturesque all along and the vistas kept changing. We also have the option of using two different routes. If someone had to do one big hike in Patagonia, we recommend the Laguna de Los Tres hike.
Day 3
We had kept this day for recovery, after the big hike. We woke up as late as possible, making it to breakfast just in time. With some more lazing around and a good lunch at the hotel, we left in the afternoon with plans to visit two attractions that are somewhat off the main tourist circuit – Laguna Azul and Cascada del Rio Paine (Paine waterfall).
We headed towards Laguna Amarga entrance and turned to the road to Laguna Azul just before the entrance. Since this route was not on the main tourist circuit, there were fewer vehicles and we also saw more guanacos. It was really windy when we got down at Laguna Azul. There were only a couple of other cars in the parking, and it felt like an untouched little corner of this magnificent park almost all to ourselves.
The sun kept playing hide and seek with the clouds. When the sun came out, the colour of the water would be a radiant blue and the surrounding hills would appear more green. We would hurriedly snap off a few pictures before it would get covered by another cloud, making everything colder and greyer. We spent almost an hour on the lake side, playing with light and shadows.
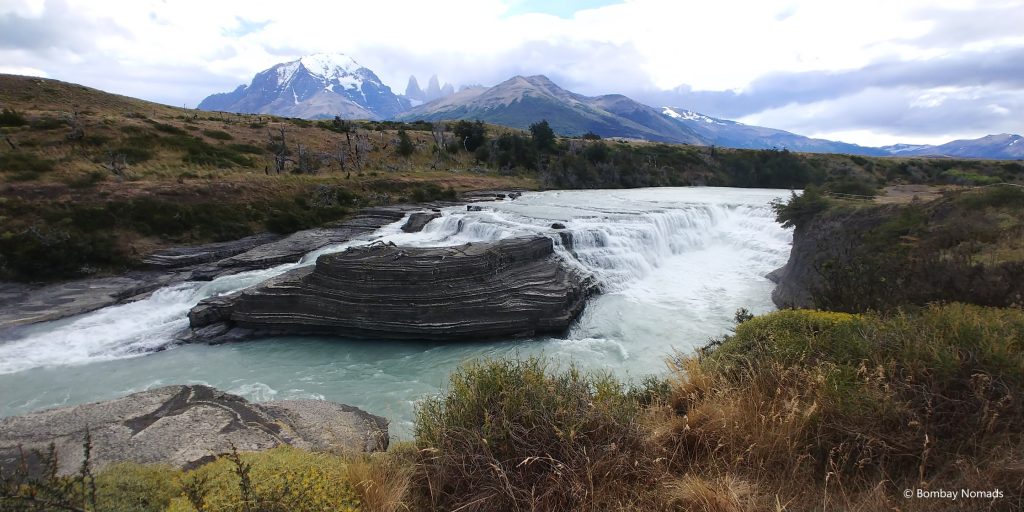
Our next stop was the Paine waterfall. The wind had picked up a bit and there was a little pitter patter of rain too. But thankfully, the dreaded downpour never materialized. The Paine waterfall is beautiful and grander than the more famous Salto Grande waterfall. But there were fewer number of people as it’s not on the map for the day trippers from Puerto Natales.
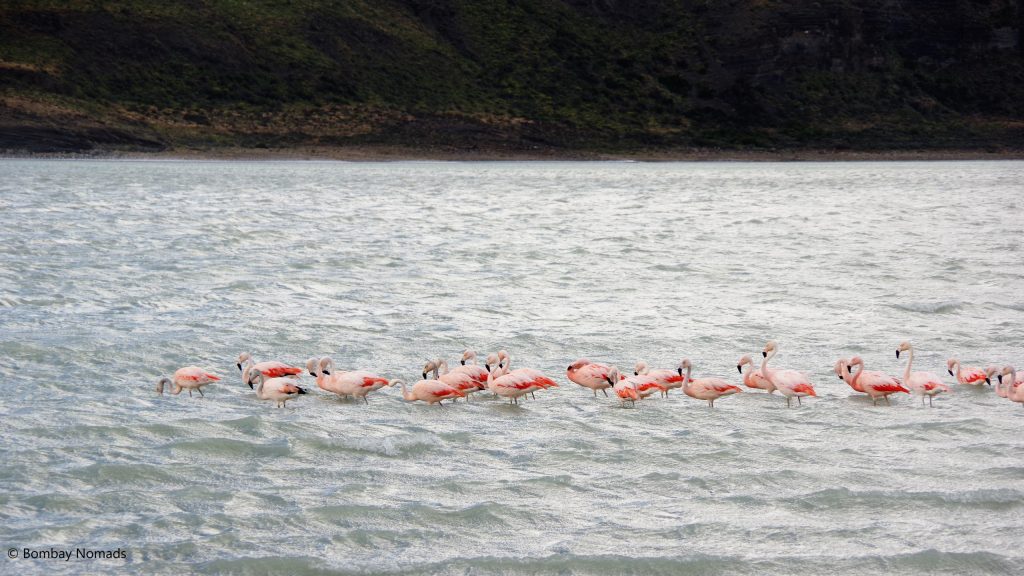
We would have loved to contemplate the waterfall for a while longer, but it was already 17:00 and we had to travel all the way to Puerto Natales that day – to fill up our gas tank again! But at Laguna Amarga, the sight of pink flamingos on the water made us stop. There was a large group of birds, feeding very close to the shore. We parked our vehicle and walked down to the shore of the lake. The wind was still very strong and we buried our hands in our jacket pockets to keep them warm.
But we could not take photos with hands in our pockets, could we? So poor hands were exposed to the biting cold winds as we clicked in a frenzy once we reached the shoreline. The birds slowly moved away from us and they were soon beyond the 135mm range of our Pentax. So, we beat a hasty retreat back to our car and then continued on our way.
Day 4
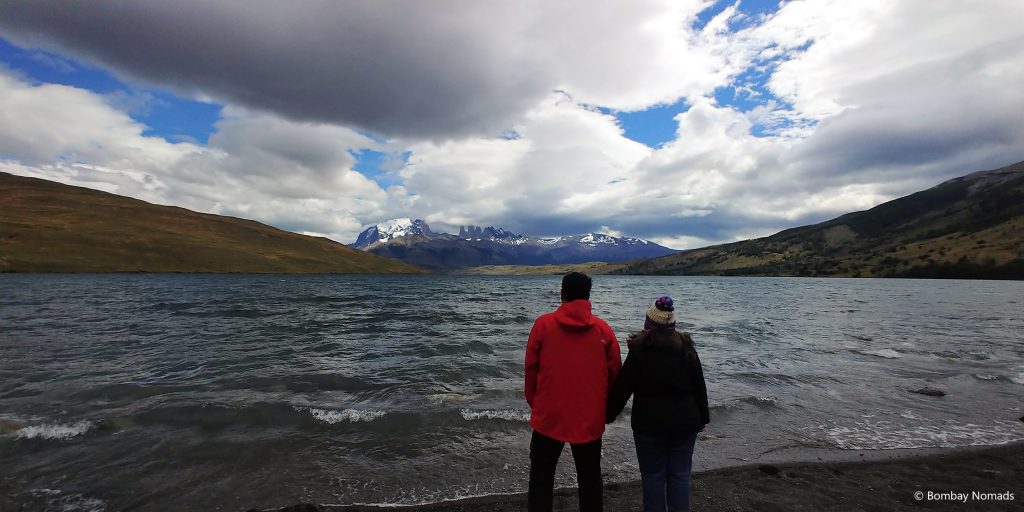
We wanted to make the most of our final day in TDP. The wind was exceptionally strong that day. As soon as we entered the park through the Lago Sarmiento entrance, we got a lucky break as we spotted Rhea birds grazing on a grassland next to the road. These are large flightless birds, similar in appearance to Ostriches (Africa) and Emus (Australia). The flat grassland was being shared by the group of rheas, some guanacos and sheep. We had to stop again near Laguna Amarga and Lago Nordenskjold, marvelling at how amazing these lakes looked, even though we had been looking at them for the past few days.
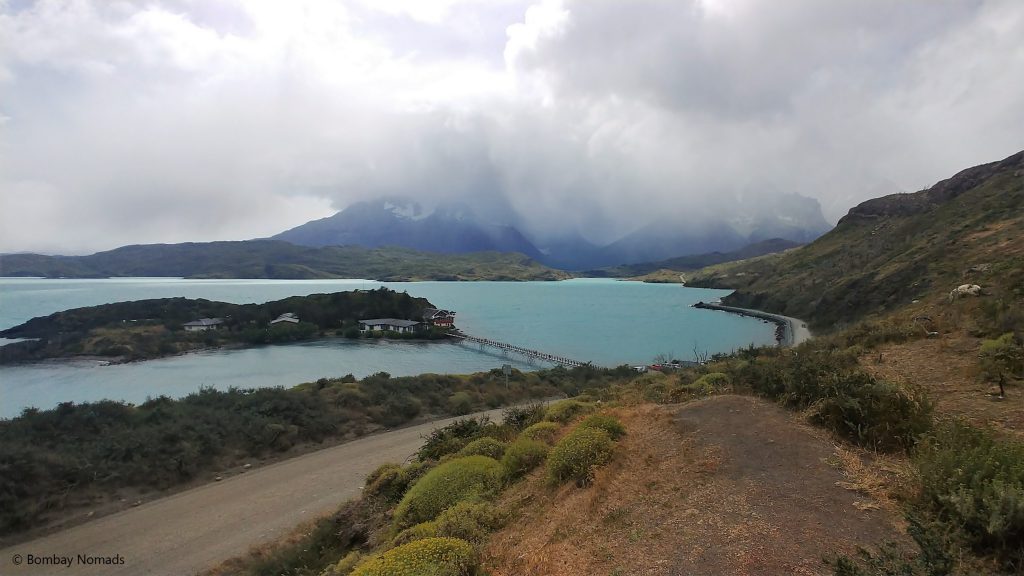
Our first destination of the day was Lago Pehoe lookout. Near the Lago Pehoe lookout is Hosteria Pehoe, the most iconic accommodation in Torres del Paine, as well as the first ever. Set on its own island inside Lago Pehoe and looking at the magnificent. The entire setting is indescribably beautiful, even though we did not get the cloudless view that we had seen on day 1.
We then set out to Glacier Grey, which was quite a distance away (~28 km, 45 mins), and the drive was quite featureless. There is a large parking space and a restaurant at the start of the Mirador Grey walk. The walk to Mirador Grey is across a dried-up lake bed, which is separated from the actual Lago Grey by an embankment of small stones. We climbed the embankment and immediately got assaulted by crazy winds coming from Lago Grey. The wind was creating such frothy waves on the lake, that it seemed we were walking on a seashore rather than an inland lake. We found ourselves continually adjusting our course, as the wind kept forcing us off our course.
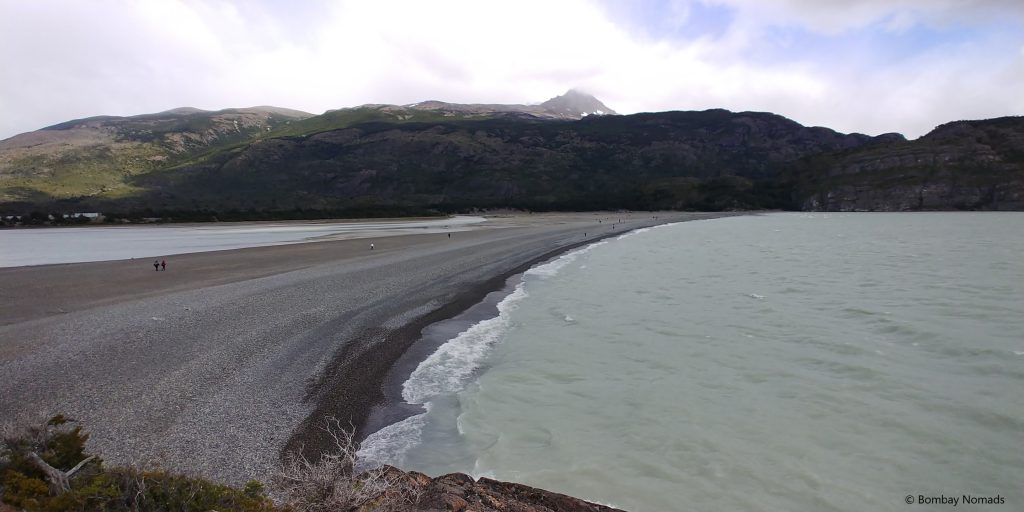
The Mirador is on what would have been a small island in the lake once. It is an easy 15 min climb from the dried-up lake bed on a well-marked trail. The view of the Grey glacier from the Mirador is nothing much though. The glacier is really far away and even a 300mm lens would not be enough for getting any decent pictures. The island is also the starting location of the Lago Grey ferry, which takes passengers on a round trip to the Grey glacier and also transports hikers on the W and O circuits. For someone who has not seen other Patagonian glaciers yet, the boat ride is a good attraction, but the walk to the Grey glacier mirador itself was nothing to write home about.
The walk back to the parking was bleak and cold, with the wind continuing to torment and some light showers thrown in for good measure. But the bright and warm Rio Pingo cafeteria at the head of the trail brought us some cheer. We had a hot lunch and ended it with an interesting pumpkin frittata dessert – pumpkin had been fried and dunked in sugar syrup – like we make gulab jamum / jalebi.
Our last item on the to-do list in TDP was Mirador Condor, near Hosteria Pehoe. After missing the start of the trail once, when we managed to hit the correct trail, we saw that the trail climbed quite steeply the side of the mountain. We had left this hike for last because the map said 45 mins one way. But at the start of the hike to Mirador there was a board saying 1.5 hours one way! We debated whether to continue as it was already 16:00. We decided to give it a try but after climbing for about 20 mins, it looked like a really steep hike. We did not want to finish a hike at 20:00 again and Suchi’s legs were still not back to normal after the Base of Towers hike, so we decided to abandon Mirador Condor and head back to our hotel.
On the way back, we contemplated all the amazing scenery we had had the good fortune to see over the past 4 days and tried to etch it in our memories forever. We seriously doubted if any place could ever have the same impact on us.
Leaving Torres del Paine
After a wonderful 4 days in TDP, it was time to leave. We were treated to a glorious rainbow on our way to Puerto Natales – a sort of a goodbye from Torres del Paine maybe.
From our hotel, it was a quick 30 min drive to Puerto Natales. We returned the trekking poles and the rental car and headed to the bus terminal to catch the bus to Punta Arenas. The night in Punta Arenas was a small break before our next adventure began from Puerto Montt the next day.
Accommodation in TDP
Before we could plan for what to see in TDP, we had to solve the seemingly impossible challenge of finding accommodation in TDP during the peak season in early January.
Broadly, there are 4 staying options for TDP
- Inside the park: There are a very limited hotels situated inside the park proper. Given the distance from civilization and the scarcity, this accommodation tends to be very expensive (USD 1,000+ per night like Hotel Las Torres and Ecocamp Patagonia) or get booked out months in advance (Hosteria Pehoe and Hotel Lago Grey). There are also a few refugios (campsites) too, meant for multi-day trekkers covering the “O” or “W” treks. These have very basic facilities and some of them can be reached only by trekking or through catamarans.
- Just outside the park, near Rio Serrano entrance: This is where majority of the hotels are located – expensive options such as Rio Serrano Hotel & Pampa Lodge and mid-range options such as Konkashken lodge and Cabanas Lago Tyndall. However, for the peak tourist month of January, all reasonably priced options here were already booked by October of the previous year.
- In & around Cerro Castillo: Cerro Castillo is a tiny hamlet on the way from Puerto Natales to the Laguna Amarga entrance of TDP. There are a few accommodation options in and around the village.
- Puerto Natales: If you can’t find any other option, then you can stay at a hotel/hostel in Puerto Natales and drive the 100 odd km every day.
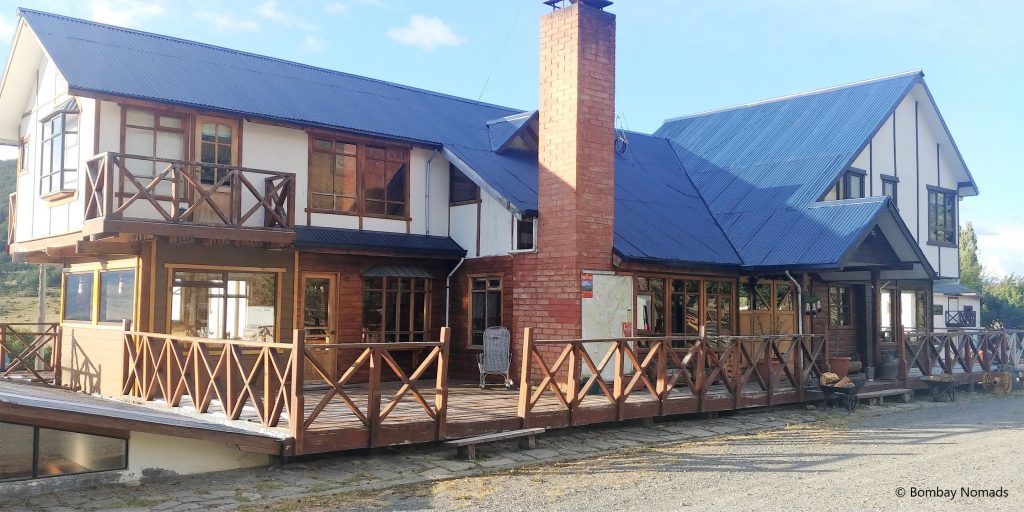
The available hotels outside Rio Serrano were upwards of USD 300 a night – and they didn’t feel like hotels that were worth that much, apart from being quite a bit over our budget. We found a compromise with Hotel Posada 3 Pasos, which is located in the middle of nowhere, halfway between Puerto Natales and Cerro Castillo. The hotel was like a large farmhouse, built almost entirely with wood (which isn’t great for noise insulation). But it was an amazingly cozy place, with fire burning 24×7 in the fireplace, a bar on one side and a restaurant on the other. Both the bar and the restaurant had large glass windows, to view the natural surroundings. We had one of the larger rooms of the house (room number 7) on the upper floor, which had a large king bed in a spacious room.
Moral of the story is to book hotel rooms in TDP 4-6 months before your actual trip. If you’re doing the “W” or “O” treks, people recommend booking accommodation a whole year before the trip!
How to reach Torres del Paine national park
- Renting a car from Puerto Natales is the best way to explore TDP national park. The Rio Serrano entrance of the park is about 1.5 hour drive from Puerto Natales
- Puerto Natales is a 3.5 hour bus ride away from Punta Arenas. Buses leave pretty much every hour from Punta Arenas to Puerto Natales. If you don’t want to spend any time in Punta Arenas, then you can take the bus directly from the Punta Arenas airport. But we highly recommend, that you spend one night in Punta Arenas and go for the half-day Isla Magdalena penguin tour –www.bombaynomads.com/cms/2019/02/patagonia-penguins-in-punta-arenas.html
- Punta Arenas has direct flights from Santiago and Puerto Montt. LatAm, Sky and Jetsmart all three airlines have daily flights between Santiago and Punta Arenas, with LatAm having most number of flights.
- Puerto Natales can also be reached by a 5-hour bus from El Calafate in Argentina
- You can look up bus schedules on https://www.busbud.com/ and https://www.recorrido.cl/en
TDP by public transport
If you don’t have a rental car in TDP and do not want to go on a day tour with one of the travel agencies, you can take buses from Puerto Natales to TDP and explore the park by walking or hitch-hiking.
- Two departure times from the Puerto Natales bus terminus: 7:00 and 14:30 hours.
- Drop-off and pick-up points inside the park are at Administrative office near Rio Serrano entrance (get off here and hitch hike to Grey glacier), Guarderia Pudeto (for Salto Grande, Mirador Cuernos and Nordenskjöld Lake lookout) and Laguna Amarga entrance (for Base of Towers hike)
- The buses from the park to Puerto Natales leave at these times:
- Administrative office: 12:00 and 18:00 hours
- Pudeto: 12:30 and 19:00 hours
- Laguna Amarga: 14:00 and 19:45 hour
- These were the timings in Jan 2019. Best to re-confirm as information could change.
Suggested itinerary for TDP
We think to do full justice to the natural beauty in TDP you need 4 days. Recommended itinerary if you have 4 days in TDP and are driving a rented car:
- Day 1: Lago Pehoe lookout, Salto Grande lookout, Mirador Cuernos (45 min hike one-way), Nordenskjöld Lake lookout
- Day 2: Base of towers hike (8-10 hours round-trip)
- Day 3: [recovery day] Cascada Rio Paine and Laguna Azul
- Day 4: Mirador Lago Grey (3 hour boat ride or 1 hour hike), Mirador Condor (1.5 hour hike one-way)
If you have only 2 days and are not doing the base of towers hike, then you can pretty much see all the above sights by car in 2 days. The other option is to do the base of towers hike on one day and see some of the highlights of the park on the second day.
If you have more time, then other places to see inside the park are Ferrier lookout (2 hour one-way hike) and Lago Toro lookout (45 min one-way hike). There are boat rides to couple of other glaciers too – Balmaceda and Tyndall.
Other useful information
- Park tickets:
- Park ticket costs CLP 21,000 per person (~USD 30) and can be bought at any of the park entrances.
- Officially, the park ticket is valid for 3 days if you enter & exit the park every day and for 5 days if you stay within the park.
- However, no one really checks how many days you use the ticket. On hearing that we planned to visit the park for 4 days, the guard himself suggested we pay for tickets on the second day, instead of having to pay for the tickets twice.
- Do remember to pick up the printed maps while buying the tickets. They will be very helpful.
- Grey glacier boat ride: The round trip to Grey glacier takes about 3 hours and costs CLP 78,000 per person (~USD 130). Boat trips run at 3 times during summer: 10:00, 13:00 and 14:00 hours. Note that you have to walk between 30-45 minutes across a pebble beach to get to the boat. Tickets can be booked at: http://www.lagogrey.com/en/navigation-to-grey-glacier/departures-rates-to-grey-glacier.html
- Eating places inside the park:
- Cafeteria in Refugio Pudeto: A pretty café, perched on the shore of a lake near Guarderia Pudeto, with a limited menu (soups and sandwiches). Highly recommend the tomato soup here.
- Rio Pingo cafeteria near the parking lot for Grey glacier: This was a more modern cafeteria and had quite an extensive menu
- Restaurant at Hosteria Pehoe: We did not eat here, so can’t say much about the food, but apparently the view from the restaurant is great.
- Most hotels will also give you packed lunches ((sandwiches, fruits, juice and nutrition bar), if you inform them the previous day (useful for hikes)
- Car renting:
- All the major international rental agencies ( Hertz, Europcar, Avis) are available in Puerto Natales, along with a few local options. We used Recasur, a Chilean car rental agency and had a very good experience.
- It is prudent to opt for windshield and tire insurance for an additional 5,000 pesos per day, as the gravel roads in the park can be risky (Our rental car in Salta suffered from a crack in the windshield)
- There are no gas stations of any kind in TDP. If you’re planning to drive around in the park for 3 days, you may have to drive back to Puerto Natales once to top up on gas.
- You can also rent your car directly in Punta Arenas, instead of Puerto Natales.
- What to wear: Dressing in layers is an absolute must – it can get warm when there is no wind, and when there is a strong wind, it can chill you to your bones. During summer, a fleece jacket and an insulated water/wind proof outer jacket with a hood are more suitable than a heavy down jacket. A woollen cap, gloves, sunglasses and sunscreen are other must-haves, and water-proof shoes if you are planning to do any serious trekking. Thermals are not needed in summer.
- Trekking poles: You can rent trekking poles (and other trekking paraphernalia) in Puerto Natales at –
- Our hotel accepted cards, but card acceptability was low inside the park. Nearest ATMs are in Puerto Natales.
- For food in Puerto Natales, we highly recommend Afrigonia restaurant. They claim to be a fusion of African spices and Patagonian produce. We can confirm it is an absolute delight, especially for those who are longing for some flavourful food. Try the Patagonian lamb.
Wonderful blog, very useful for new trip planners
like me.
Would you be having any idea of private drivers
with car who know the park well and who could
show us the highlights of TDP?
Is it better to stay in Rio Serrano or Puerto Natales
for viewing TDP attractions?
Spending a day in Punta Arenas for Penguins was a
great tip😊
Thanks and regards,
Sudhir Kochhar,
Gurgaon, Haryana.